Welcome to DU!
The truly grassroots left-of-center political community where regular people, not algorithms, drive the discussions and set the standards.
Join the community:
Create a free account
Support DU (and get rid of ads!):
Become a Star Member
Latest Breaking News
Editorials & Other Articles
General Discussion
The DU Lounge
All Forums
Issue Forums
Culture Forums
Alliance Forums
Region Forums
Support Forums
Help & Search
Cooking & Baking
Showing Original Post only (View all)Chocolate Monday! Dubai(!), Apricot Balls, Plums in Dark Chocolate, Caramel and Chocolate Dipped Apples 🌞 [View all]
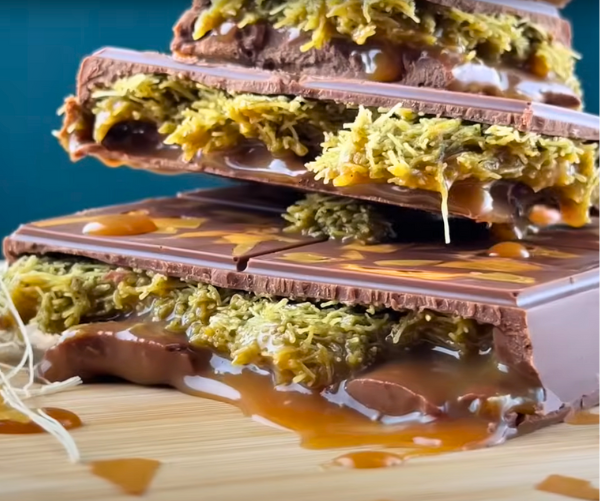
DUBAI CHOCOLATE
Tools You Need to Make Dubai Chocolate
Creating a dessert as elegant as Dubai chocolate doesn’t require
a professional kitchen—just a few reliable tools to help you layer,
shape, and finish it beautifully.
Silicone mold – to shape the chocolate and give it a smooth, glossy finish
Silicone brush or spatula – for spreading melted chocolate evenly
Non‑stick frying pan – perfect for toasting the kataifi pastry until golden
Mixing bowls – to combine pistachio paste, caramel, and other layers
Food processor – useful if you’re making homemade pistachio paste
Refrigerator space – essential for setting each layer properly
With these simple tools, you’ll be ready to transform basic ingredients
into a luxurious chocolate creation that looks as impressive as it tastes.
Ingredients
To capture the indulgent spirit of Dubai chocolate, gather these carefully
chosen ingredients. Each one adds a layer of richness, texture, or elegance
to the final creation.
Milk chocolate (300 g) (10 1/2 oz) – smooth and creamy base for the recipe
Kataifi pastry strands (70 g) (2 1/2 oz)– delicate crunch with a Middle Eastern touch
Unsalted butter (20 g) (1 oz)– enhances flavor and binds the pastry
Pistachio cream or paste (100 g) (3 1/2 oz)– nutty depth and vibrant color
Salted caramel sauce (100 g) (3 1/2 oz)– sweet‑salty balance that elevates the chocolate
Edible gold dust or glitter – a luxurious finish for presentation
With these ingredients, you’re not just making dessert—you’re crafting a
chocolate experience that reflects the richness and flair of Dubai itself.
How to Make Dubai Chocolate at Home
This dessert layers rich chocolate, nutty pistachio, and golden
crunch into a treat that feels as luxurious as Dubai itself. Follow
these simple steps to recreate it in your own kitchen.
Lightly dust a silicone mold with edible gold glitter to create a shimmering
base. Melt 150 g (5 1/4 oz)of milk chocolate, pour it into the mold, and
spread evenly with a brush. Chill until firm. In a pan, toast 70 g (2 1/2 oz) of
kataifi pastry with 20 g (1 oz) of butter until crisp and golden. Combine the
crunchy kataifi with 100 g (3 1/2 oz) of pistachio paste, then spread this
mixture over the set chocolate layer. Smooth gently. Add a layer of 100 g
(3 1/2 oz) of salted caramel, then refrigerate again until it firms up. Melt
the remaining 150 g (5 1/4 oz) of chocolate and pour it over the top to seal
the layers. Chill until completely set.
Once firm, carefully release the chocolate from the mold and admire your
golden, layered masterpiece.
Homemade Pistachio Paste
Blanch 150 g of raw pistachios in boiling water for 2–3 minutes.
Rub off the skins with a towel to reveal bright green nuts.
Blend until smooth, adding 1–2 teaspoons of neutral oil
(like almond or sunflower) for creaminess. Store in an airtight
jar and use in desserts, including this Dubai chocolate recipe.
This recipe is more than just a sweet it’s an edible jewel. Each bite
combines crunch, creaminess, and a hint of luxury, making it perfect
for special occasions or when you want to impress.
Pro Tips
Mastering Dubai chocolate is all about patience and precision.
These tips will help you achieve a flawless, luxurious finish every time.
Use quality chocolate – the better the chocolate, the richer and smoother your final dessert will taste.
Don’t rush the layers – chilling each layer fully before adding the next keeps the dessert neat and prevents mixing.
Toast kataifi carefully – keep the heat medium‑low so it crisps evenly without burning.
Homemade pistachio paste – making it fresh gives a brighter color and more intense flavor than store‑bought.
Decorate just before serving – add the edible gold dust at the end for maximum shine and elegance.
With these thoughtful touches, your dessert transforms from a
simple recipe into a culinary statement one that reflects both
artistry and indulgence.
Storage & Serving Tips
To keep your Dubai chocolate tasting as luxurious as the day you made it, a little care in storage and serving goes a long way.
Refrigeration: Store in an airtight container in the fridge for up to 5 days to preserve freshness and texture.
Freezing: Wrap individual pieces in parchment and freeze for up to 1 month. Thaw slowly in the refrigerator before serving
.
Serving: Let the chocolate rest at room temperature for 10–15 minutes before enjoying—this softens the layers and enhances flavor.
Presentation: Garnish with a sprinkle of pistachios or a touch of gold dust just before serving for maximum visual impact.
Handled with care, this dessert transforms into more than just a sweet—
it becomes a centerpiece of indulgence, ready to impress at any occasion.
https://allrecipeschocolate.com/dubai-chocolate-recipe/
*********************************************************************
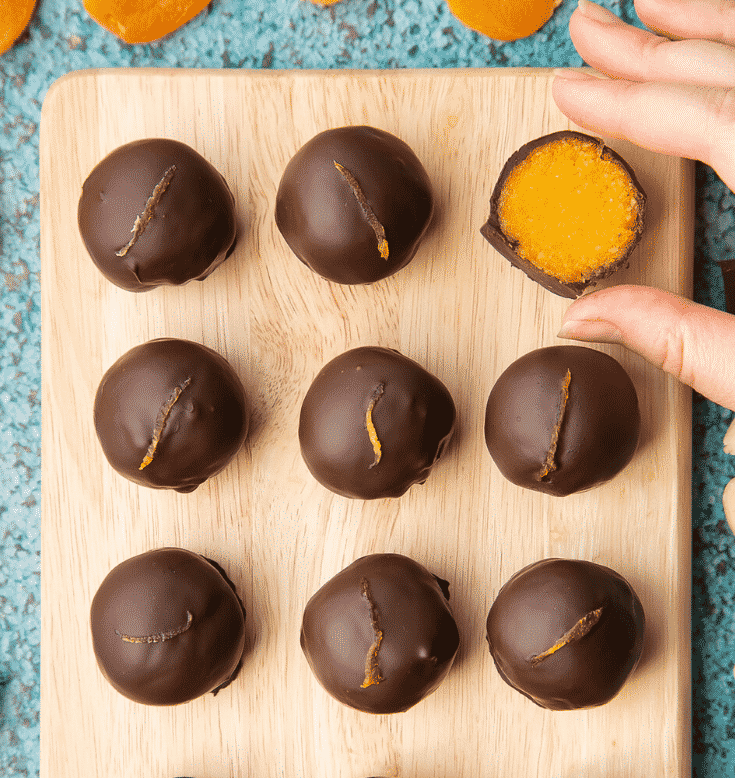
Chocolate Apricot Balls Recipe
It only takes three ingredients and a few minutes to make these
chocolate apricot balls, yet they look and taste incredible.
Prep Time 15 minutes
Total Time 15 minutes
Servings: 12 balls
Author: Emily Leary
Ingredients
200 g (7.1 oz) dried apricots plus a single dried apricot cut into thin slivers
100 g (3.5 oz) blanched almonds or cashews, or a mix of the two
150 ml (5.1 floz) boiling water
100 g (3.5 oz) dark chocolate (bittersweet)
Instructions
Put the apricots and almonds in a heat-resistant bowl.
Pour the boiled water into the bowl, stir and leave to soak for 5 minutes. Drain.
Put the apricots and nuts in a blender. Blitz until they come together into a thick paste.
Take a tablespoon of the apricot mix and roll in into a ball. In total,
you could get 12 balls. If you’d rather divide them by weight,
they’ll weigh about 27g (1 ounce) each.
Melt the chocolate in a small heat-resistant bowl the microwave or using a bain-marie.
Rest an apricot ball on a fork or slotted spoon lower it into the chocolate.
Roll it in the chocolate gently to coat. Lift out of the chocolate, allow any
excess to drip away.,
Place your coated ball onto a baking tray lined with greaseproof paper.
Repeat until you have coated all 12 balls. Top each ball with a sliver of
apricot. Leave the chocolate to set.
Notes
These apricot chocolate balls could also be dipped into sprinkles or
crushed up nuts while the chocolate is still melted for extra crunch.
Why not experiment with milk or white chocolate too?
https://www.amummytoo.co.uk/chocolate-apricot-balls/
***************************************************************************
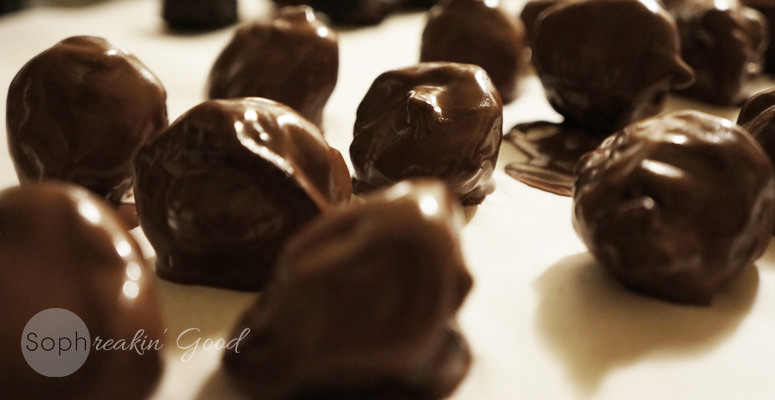
Plums in Dark Chocolate
There is this Russian candy called sliva v shokolade, which translates to “plum in chocolate”. There are two (sometimes even three) kinds, depending on what colour the wrapper is. One of them has a hazelnut inside, one of them has an almond. If I’m not mistaken, the third kind has a walnut. Realistically, it’s nothing more than a nut inside a prune, covered in chocolate. Why is it that the simplest things are so much better than the sum of their parts?
When I was younger, sliva v shokolade was always my favourite candy, even when I had the choice of plenty of others. There was korovka (meaning “little cow” – a caramel candy), or griliaj (don’t know what that means, but it was a nut cluster that could chip your teeth if you weren’t careful), strela (meaning “arrow”, a confection made with cooked condensed milk, kind of like dulche de leche), or even ptichie moloko (which means “birds milk”, and was basically a chocolate covered marshmallow, although that name always grossed me out a little…)
Quick facts: making these is super simple, but these bon-bons are fancy enough to serve to guests. And the only reason I chose to call them plums in dark chocolate instead of prunes in dark chocolate is because prune has a geriatric ring to it that instantly conjures up thoughts of irregularity…
As usual, this is more of a method than an exact recipe, so feel free to adjust quantities as needed.
Directions
As the prunes are pitted, each one will already have a hole – find it and stuff one hazelnut (or other nut) into each prune.
Set the stuffed prunes aside.
Line a baking sheet with parchment paper.
Fill a saucepan with about an inch of water and set a small bowl on top to form a double boiler.*
Melt chocolate in the bowl of the double boiler, stirring occasionally. Once the chocolate is mostly melted, add in several tablespoons of coconut milk and stir until everything is combined.
Remove the bowl from the double boiler (careful, it will be hot!) and using a fork, carefully dip each stuffed prune in the chocolate. Shake off the excess and place onto the parchment paper.
Once all the prunes have been dipped, place the baking sheet in the fridge and allow the chocolate to harden.
Enjoy!
* You can also melt the chocolate in the microwave – make sure to use short bursts so that the chocolate doesn’t burn.
These are stupidly simple to make and taste absolutely divine. Give them a try – they’re sophreakin’ good!
Ingredients
10 pitted prunes (unsulfured are best)
10 hazelnuts, pecans, almonds or walnut halves, lightly toasted
several squares of dark chocolate (I love Lindt 85% or 90%)
several tablespoons of full fat coconut milk
https://www.sophreakingood.com/plums-in-dark-chocolate/
**************************************************************************

Caramel and Chocolate Dipped Apples
These chocolate dipped caramel apples are an absolutely delicious treat and are great for any occasion. The granny smith apples that are used in this gourmet chocolate covered apples recipe are tart and complement the sweetness of the chocolate and caramel. Finely chopped almonds are used to coat the exterior adding a satisfying texture and crunch. Caramel and chocolate dipped apples are a well-loved dessert particularly for certain holidays such as Halloween, Christmas and Valentines day.
Easy chocolate covered apples are a great gift to make for family and friends during for holidays. In this recipe, I offer two variations for the caramel – store bought soft chewy caramels or homemade caramel – both instructions are below.
My favorite way to enjoy this recipe is to cut up the end product and turn this into sliced chocolate covered apples. They are easier to eat, fun and pretty too! The almonds used in this recipe really put the cherry on top, the crunch is so good with the chocolate, caramel and crisp refreshing apple. Chocolate covered apples with nuts are the most popular gourmet apple recipe and for good reason. If you have not had one of these, do yourself a favor and get on this one.
Many people may affectionately think of this recipe and reminisce on Halloween chocolate covered apples. I have also seen these dark chocolate covered apples sold and marketed a lot around Christmas and for Valentines day. I remember seeing kits at the grocery stores around these particular holidays marketing them as covered apples gifts kits.
The best apples to dip in chocolate are large green Granny Smiths. Look for green granny smith apples – which tend to be a larger variety of apples – and make yourself some giant chocolate covered apples! They are easier to cut into slices and the proportions tend to be more favorable as the more apple, the more refreshing, hydrating and crisp the dessert will be.
I know you will love these chocolate covered granny smith apples so continue below to learn about the notes and methods for executing them perfectly.
Ingredients:
Granny Smith apples
Dark chocolate
Almonds
Homemade caramel dipping sauce:
Cane sugar
Butter
Cream
Sea salt
*Or chewy caramels (store bought)
Notes and quantities:
6 large green granny smith apples
1 bag of dark chocolate chips
1/2 cup of almonds
For homemade caramel:
2 cups of cane sugar
6 Tablespoons of butter
1 cup cream
Small pinch of salt
Instructions:
Prepare the apples by washing and drying them, then stick
the wooden popsicle stick where the stem once was.
Make the homemade caramel sauce or melt the store bought
chewy caramels.
Finely chop the almonds and spread the chopped nuts evenly
onto a plate.
When the caramel is a warm and workable, tilt the sauce pan
and dip half of the apple in and rotate the apple so that it is
completely coated. Let some of the excess caramel(if there is
any) drip back in to the pan and then place the apple on wax or
parchment paper. Repeat this process with all of the apples and
all let them set and harden.
Once the caramel has hardened, prepare the dark chocolate by
melting it in a glass bowl, using the double boiler method.
When the chocolate is fully melted, stir and repeat the dipping
process the same as you did with dipping the apples into the caramel.
After all of the caramel apples are dipped in chocolate and replaced
back on to the wax paper, allow the excess chocolate to settle. Before
the chocolate dries, sprinkle the nuts onto the apples or pick the apples
back up by the wooden popsicle stick and gently roll the chocolate
apple in the nuts.
If the weather is particularly hot you can help the setting and hardening
process by placing the apples in the refrigerator.
After the chocolate covered caramel apples have fully set and hardened,
you can use a large sharp knife to cut them in to slices for easier eating.
Instructions for the homemade caramel sauce:
Pour 2 cups of cane sugar into a sauce pan and put on medium heat.
The sugar will eventually melt. Watch the sugar carefully during the
melting stage as it can burn easily, so make sure the color does not get
too dark. The indicator of the liquid sugar burning is the color darkening
very quickly – so make sure to turn down the heat to low if you notice that.
Add 1 Tablespoon of butter at a time, stir it in until it is fully incorporated,
the caramel will react to adding the butter and cream and make a rapid,
intense bubbling, this is normal so don’t be alarmed.
After all of the butter has been incorporated, slowly add in the cream with
the same process, incrementally and stirring continuously.
Add a pinch of salt.
Notes
-I think the best chocolate to use for chocolate covered apples is
dark chocolate because it creates a rich contrasts to the fruit.
-Try coating the exterior of the dark chocolate dipped apples with
any thing you love. I suggest trying nuts, sprinkles or coconut.
-A fun suggestion is to chop a variety of different nuts such as
almonds, peanuts, pistachios and make the chocolate covered
apples rocky mountain recipe.
-Find the largest granny smith apples that you can. Large chocolate
covered apples will be easier to slice and more fun to eat.
-You can find these gourmet apples at the store but I encourage
trying to make homemade chocolate covered apples with this recipe
because they always taste better and they are fun to create!
-Making chocolate covered apples is an exceptionally fun recipe
for kids to partake in, so I recommend if you have kiddos to help
them facilitate this recipe!
Topping suggestions:
-Nuts: Almonds, pistachios, peanuts
-Sprinkles
-Coconut flakes
https://moleinthewall.com/chocolate-dipped-caramel-apples/
Yummy! "It's chocolate, eat it, you'll feel better!"


7 replies
 = new reply since forum marked as read
Highlight:
NoneDon't highlight anything
5 newestHighlight 5 most recent replies
= new reply since forum marked as read
Highlight:
NoneDon't highlight anything
5 newestHighlight 5 most recent replies
= new reply since forum marked as read
Highlight:
NoneDon't highlight anything
5 newestHighlight 5 most recent replies
Chocolate Monday! Dubai(!), Apricot Balls, Plums in Dark Chocolate, Caramel and Chocolate Dipped Apples 🌞 [View all]
justaprogressive
Monday
OP